Fixing a Protel Payphone Part 5: The PBX & Dial-in
This post is a continuation in a series, “Fixing a Protel Payphone.” To view the previous installment, check out Fixing a Protel Payphone Part 4: XNet Config
With XNet now configured, the last step was to take care of the connection between the phone and the modem. Normally this wouldn’t be a problem as I can usually take an ATA or two and configure them on my Asterisk PBX and things work without issue. However, this wasn’t the case for Protel programming, and I was constantly bothered by calls dropping or connection failures early in the handshake process.
I encountered a similar issue when working on a Nortel Millennium phone, but found that the connection would normally survive long enough to allow programming if I used a 2-port ATA with direct calling between the ports (no PBX needed). This wasn’t the case this time around and calls set up this way were just as unreliable as calls through the PBX.
When I looked to see if others encountered this problem, many people said that programming over VoIP wouldn’t work at all, and recommended alternatives such as an analog PBX or phone line simulator. Both of these are tested methods with reported success, and I also became aware of another method from Peter of http://telesfor.org/payphones/ who told me he had success with a 2-port ATA with some capacitors soldered between the tip and ring lines of each port. So while he did ultimately use VoIP, it was in a method similar to a line simulator.
One of the goals of this project was to make this programming line available to the public, so I didn’t even want to entertain one of these above-mentioned methods unless I absolutely had to.
To have this be successful, I wanted the programming to work over VoIP.
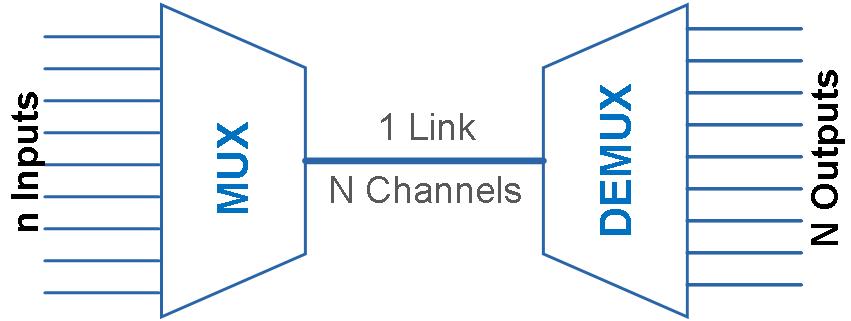
The Channel Bank
Channel banks are devices for multiplexing/demultiplexing communications channels from analog/digital lines into one high-bandwidth channel like a DS1 (T1) circuit so all calls can happen simultaneously over a single trunk line cable (thanks Wikipedia). Essentially, a T1 allows for 24 simultaneous calls, so if I can configure a PBX with a T1 connection, I can use a single cable to communicate between it and a channel bank, which in-turn will break out all of these lines into analog connections for phones, modems, etc. Historically, channel banks could typically found in a few different applications including being a part of a large PBX system or even for servicing telephone subscribers directly, and using one seemed like a reliable method for hooking my modem up to an Asterisk system.
Hobbyists like channel banks because of the call quality and support for many lines, but they are more difficult to setup than a typical ATA (and more expensive). I was sent a Carrier Access Adit 600 channel bank, a fairly popular modem, a few years back from a friend who saved it from being thrown away after it was decommissioned at a CO. While I was able to get it for free, these are readily available on the second-hand market for under $100.

The Adit 600 is modular and can hold up to seven cards in its chassis. The left-most card is almost always going to be a TDM controller (which facilitates the muxing/demuxing) but the other six slots can be used for one of several types of cards depending on your needs. Mine came with a single 8-port FXS card which means I can hook up eight analog telephony devices (phones, modems, etc.) to the channel bank. Most second-hand Adits come with at least one FXS card, so most people will be able to get up and running pretty quickly without needing to hunt one down.
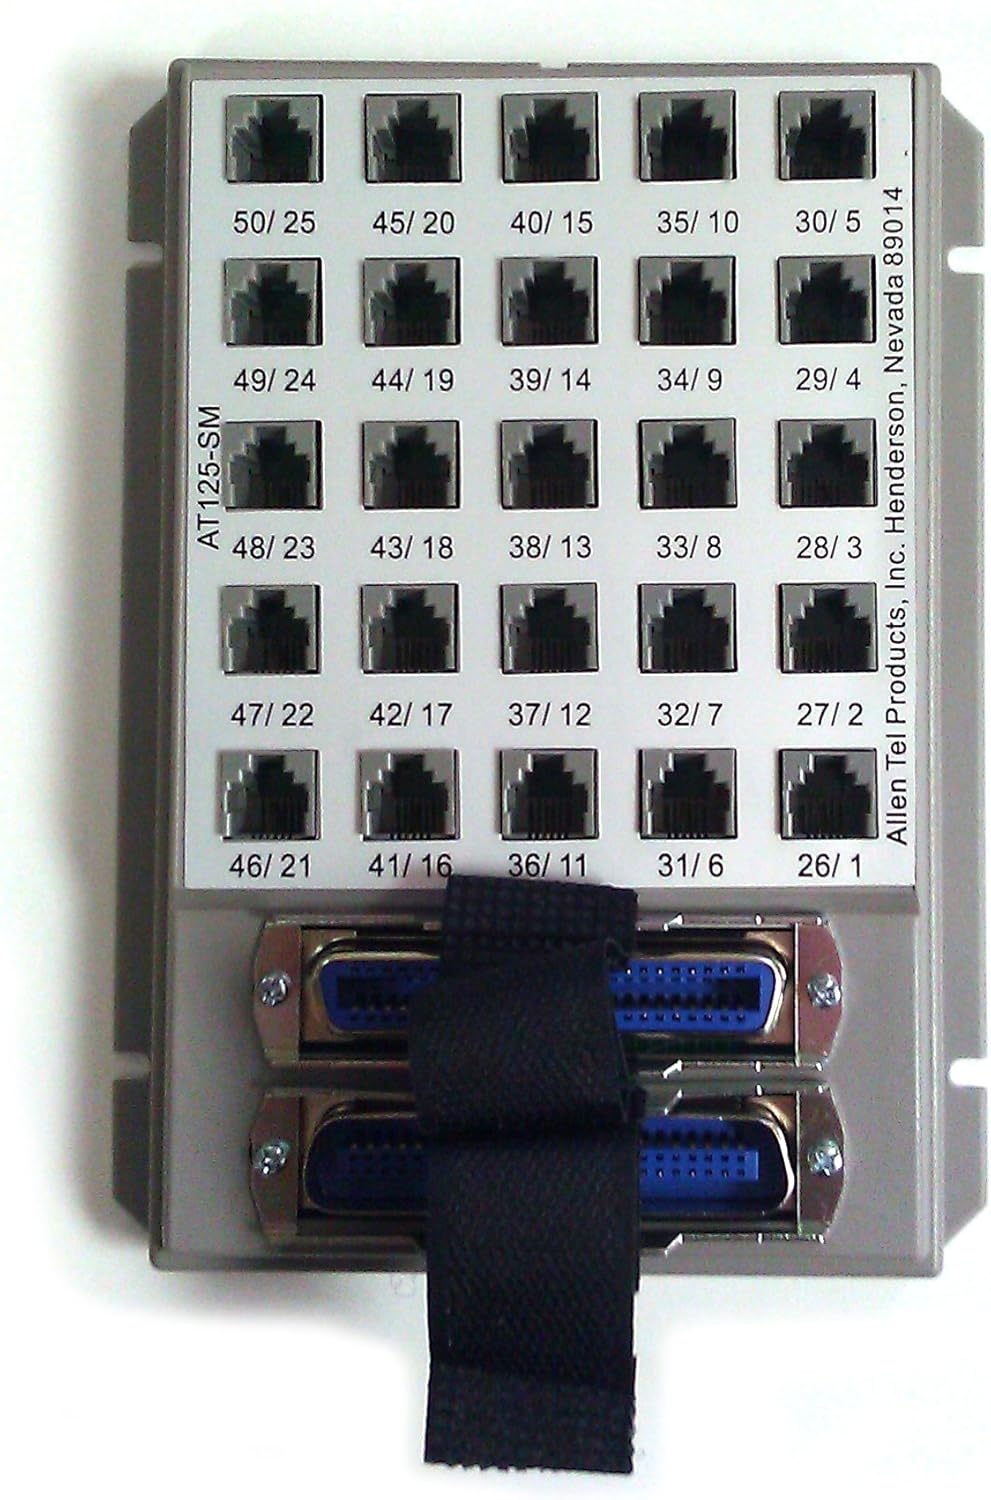
Phones interface with the channel bank by way of an RJ-21 connector, so something is needed to break out lines into RJ-11 jacks. Initially, I purchased a 25-pair cable with an RJ-21 connector on one side and bare ends on the other that I crimped RJ-11 connectors on to, but more recently I purchased and Allen Tel AT125-SM breakout panel which is much easier to use with pre-terminated phone cables.
By default, the Adit won’t do much until it is programmed. Luckily, it has a serial port for programming, so we can hook up a serial cable and/or USB adapter and configure it via the onboard DE-9 port.
Assuming we are on Linux and using a USB adapter, we can connect to the Adit at 9600bps 8N1:
$ screen /dev/ttyUSB0 9600
First, we want to start fresh and load factory defaults. This can be done with the following commands:
restore defaults
reset
When prompted, press Y to continue.
Now, we will disable the DIP switches on the TDM controller so that all of the configuration is set via programming:
set local off
The Adit 600 has a primary and secondary T1 interface, so before configuring anything we need to bring them both down:
set a:1 down
set a:2 down
The TDM controller is in slot A, hence the a:# label.
We also want to remove all the channel mapping loaded by default, so we can run the following:
disconnect a
When prompted, press Y to continue.
Now, we will configure eight FXS lines to be voice lines with ground start for use on the primary T1 interface:
set a:1:1-8 type voice
set a:1:1-8 signal gs
Next, we have to configure the FXS card (in slot 1), setting each FXS line as ground start to match what we performed above:
set 1:1-8 signal gs
Now we connect the lines in the T1 to the FXS lines:
connect a:1:1-8 1:1-8
We will be using the Adit as a clock source for Asterisk when we set that later, so we will set the clock to be internal:
set clock1 internal
Finally, we can bring up the interface to finish programming:
set a:1 up
That’s all it takes, the Adit 600 is now ready for the next part of the process.
The T1 Card
To connect our channel bank to our PBX, we will need a T1 card installed to facilitate connection. T1 cards have historically been produced from a handful of different companies and are available for both PCI and PCIe slots with between one and four T1 ports. The most popular cards are produced by Digium, a now-defunct company that previously maintained Asterisk. Digium’s successor and purchaser, Sangoma, produces their own cards, though they are more difficult to use.
I bought my T1 card, a Sangoma A101, about 7 years ago when I saw a good deal to buy it second-hand. At the time, I didn’t know a lot about T1 cards, but they are often listed for sale new at over $700 so when I was able to get one for $30 I did. If you are doing this for the first time, I highly recommend holding out for a Digium card if your PBX has a slot that fits it. As we will discuss below, Sangoma cards can cause many more headaches and there isn’t much of a prices difference these days between the cards, which can be found for ~$50 on the second-hand market.
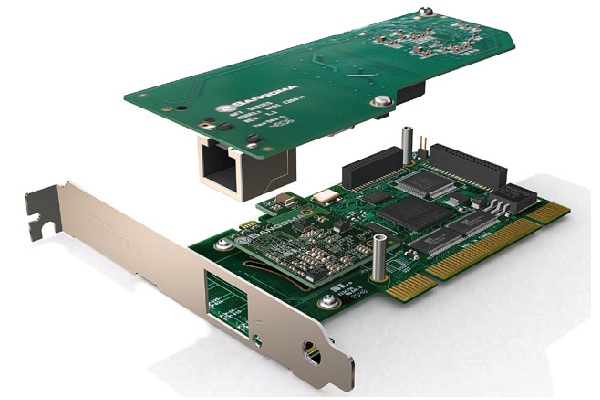
The Sangoma A101 I have is a bit of an interesting card, and I get the feeling it may have been cobbled together. The A10x cards look to be built from two boards sandwiched together, featuring a motherboard and a daughterboard. The daughterboard is where the ports are installed, so the motherboard may or may not be standardized and different cards are made by attaching different daughterboards depending on what model they choose to sell it as. The main board on my card is labeled “A102” even though it is a one-port card, so I’m not sure if it came from the factory this way. It also has a low-profile bracket, which I don’t believe was standard.
I ended up acquiring a machine based on this card’s needs, which wasn’t difficult. The card has a PCIe x1 connector, so anything with PCIe would work. The only other stipulation was that since I only had the low-profile bracket, I wanted something that fit low profile cards. I didn’t want to run without a bracket and a full-size bracket second-hand would cost just as much the card itself! I stumbled upon a Lenovo ThinkStation E32 SFF machine that had everything I needed and I was able to get it for $30.

Aside from the E32, the channel bank, the Rj-21 breakout, and the T1 card, the only other thing I ultimately purchased was an inexpensive T1 cable. While a T1 cable resembles a standard ethernet patch cable, it has different wiring (though it does use 8P8C connectors so you could easily make one yourself) so make sure you have a dedicated and clearly-labeled T1 cable between the card and channel bank.
The difficulty of using Sangoma T1 cards comes from use of Wanpipe drivers. Asterisk typically interfaces with T1 cards via DAHDI drivers, developed by Digium for their cards. Sangoma uses the Wanpipe driver to act as an adapter between their cards and DAHDI. As far as DAHDI is concerned, this is a Digium card, but the additional level of abstraction can cause configuration and compatibility issues.
On this machine I originally installed Debian 12 as it was the latest Debian version available, but was unable to compile Wanpipe as expected. Sangoma does offer support for their products, even if you are not the original owner and bought the thing years ago, so after putting in a ticket with them about the issue I was facing, they recommended I instead use Debian 11. At the time, they only officially supported Debian 11 as Debian 12 was more recently released and not yet tested. This seemed like a fair ask as Debian 11 was the LTS release. However, when I installed the latest version of Debian 11 and attempted to install the latest Wanwipe firmware, I encountered a different error and went back to Sangoma with my findings. I was informed that they would look into it, but I had no immediate fix. As a hail-mary, I tried out Osmocom’s alternate wanpipe build scripts but these didn’t seem to work for me either.
I wanted to troubleshoot the issue myself to see if I could work around it. It seemed that the existing code need to reference /usr/src/linux-headers-$(kernel-version)/include/linux/version.h but this file doesn’t exist on Debian. On Ubuntu systems, this file exists, but it is a symlink for /usr/src/linux-headers-$(kernel-version)/include/generated/uapi/linux/version.h. So, I modified the build script to use this file instead and the driver installed without issue! I ended up forwarding this fix to Sangoma, and this was ultimately patched within a few months. I wasn’t waiting that long however, I had the build working so I carried on.
Installing Asterisk, DAHDI, and wanpipe
To install Asterisk, DAHDI, and Wanpipe, I leveraged Phreakscript which can be used to automate a lot of this installation. At the time of installation, I used Debian 11.8, Asterisk 21.0.0, DAHDI 3.3.0-rc1, and wanpipe 7.0.36.
As a root user I downloaded and built Phreakscript, then updated it,
# cd /usr/local/src; wget https://raw.githubusercontent.com/InterLinked1/phreakscript/refs/heads/master/phreaknet.sh; chmod +x phreaknet.sh; ./phreaknet.sh make
# phreaknet update
Next, I installed Asterisk with the d flag to build it with DAHDI support,
# phreaknet install -d
Then, I setup some audio pieces, adding revertive pulsing sounds and the Pat Fleet audio library,
# phreaknet pulsar
# phreaknet sounds --boilerplate
Next, because this node is on PhreakNet, I configured it to add boilerplate PhreakNet configuration for my node and rotate keys. Then I edited some config to better suit my exchange as the boilerplate configs assume a reserved thousands block of 555-0 whereas mine is 263-1,
# phreaknet config --api-key=JpA4eNQs5cmG12B8rpHlNmIKen98IxnCUcgU7KZs2TCiu1aH --clli=PHLAPASODS0 --disa=2630111
# phreaknet keygen --rotate
# sed -i 's/5550/2630/g' /etc/asterisk/dialplan/phreaknet.conf
# sed -i 's/5551/2630/g' /etc/asterisk/dialplan/phreaknet.conf
# sed -i 's/5552/2630/g' /etc/asterisk/dialplan/phreaknet.conf
# sed -i 's/5559/2630/g' /etc/asterisk/dialplan/phreaknet.conf
# sed -i 's/\[19]/0/g' /etc/asterisk/dialplan/phreaknet.conf
# sed -i 's/555/263/g' /etc/asterisk/dialplan/phreaknet.conf
# sed -i 's/5551111/2630111/g' /etc/asterisk/verify.conf
# sed -i 's/;bindport/bindport/g' /etc/asterisk/iax.conf
# sed -i 's/somethingyoushouldchange/d7630991411b8329c395a4f9c0ec3e6c1c96695b28b2a91e/g' /etc/asterisk/iax.conf
# sed -i 's/4569/4570/g' /etc/asterisk/iax.conf
# sed -i 's/5551111/2630111/g' /etc/asterisk/verify.conf
# systemctl restart asterisk
Now, the moment of truth, installing wanpipe,
# phreaknet wanpipe
After it installs, we want to make sure that the kernel modules for Wanpipe/DAHDI support are auto-loaded at boot. To do this we can modify /etc/modules to include dahdi, wanpipe, and wanec,
# cat /etc/modules
...
# /etc/modules: kernel modules to load at boot time.
#
# This file contains the names of kernel modules that should be loaded
# at boot time, one per line. Lines beginning with "#" are ignored.

dahdi
wanpipe
wanec
ANow, we need to configure Wanpipe. PhreakNet documentation recommends running wancfg, but this didn’t end up working for me. Ultimately, I used wancfg_dahdi which seems like a similar tool,
# wancfg_dahdi
########################################################################
#                          Sangoma Wanpipe                             #
#        Dahdi/Zaptel/SMG/TDMAPI/BOOT Configuration Script             #
#                             v2.51                                    #
#                     Sangoma Technologies Inc.                        #
#                        Copyright(c) 2016.                            #
########################################################################

Would you like to generate /etc/asterisk/chan_dahdi.conf
 1. YES
 2. NO
[1-2]:1

-------------------------------------------------------
Configuring T1/E1 cards [A101/A102/A104/A108/A116/T116]
-------------------------------------------------------
A101 detected on slot:4 bus:3

-----------------------------------------------------------
Configuring port 1 on A101 slot:4 bus:3.
-----------------------------------------------------------

Select media type for AFT-A101 on port 1 [slot:4 bus:3 span:1]
 1. T1
 2. E1
 3. Unused
 4. Exit
[1-4]:1

Configuring port 1 on AFT-A101 as: T1, coding:B8ZS, framing:ESF.
 1. YES - Keep these settings
 2. NO  - Configure line coding and framing
[1-2, ENTER='YES']:1

Select clock for AFT-101 on port 1 [slot:4 bus:3 span:1]
 1. NORMAL
 2. MASTER
[1-2]:1

Select signalling type for AFT-101 on port 1 [slot:4 bus:3 span:1]
 1. Zaptel/Dahdi - PRI CPE
 2. Zaptel/Dahdi - PRI NET
 3. Zaptel/Dahdi - E & M
 4. Zaptel/Dahdi - E & M Wink
 5. Zaptel/Dahdi - FXS - Loop Start
 6. Zaptel/Dahdi - FXS - Ground Start
 7. Zaptel/Dahdi - FXS - Kewl Start
 8. Zaptel/Dahdi - FX0 - Loop Start
 9. Zaptel/Dahdi - FX0 - Ground Start
 10. Zaptel/Dahdi - FX0 - Kewl Start
 11. Sangoma SMG/sangoma_prid- PRI CPE
 12. Sangoma SMG/sangoma_prid- PRI NET
[1-12]:10

Would you like to enable hardware DTMF detection?
 1. YES
 2. NO
[1-2, ENTER='YES']:1

Would you like to enable hardware fax detection?
 1. YES
 2. NO
[1-2, ENTER='NO']:2

Configuring port 1 on AFT-101 as a full T1
 1. YES - Use all channels
 2. NO  - Configure for fractional
[1-2, ENTER='YES']:1

Select dialplan context for AFT-101 on port 1
 1. from-pstn
 2. from-internal
 3. Custom
[1-3]:2

Port 1 on AFT-A101 configuration complete...
Press any key to continue:

T1/E1 card configuration complete.
Press any key to continue:

-------------------------------------------
Configuring ISDN BRI cards [A500/B500/B700]
-------------------------------------------

No Sangoma ISDN BRI cards detected

Press any key to continue:
------------------------------------
Configuring GSM cards [W400]
------------------------------------

No Sangoma GSM cards detected

Press any key to continue:


###################################################################
#                             SUMMARY                             #
###################################################################

  1 T1/E1 port(s) detected, 1 configured
  0 ISDN BRI port(s) detected, 0 configured
  0 analog card(s) detected, 0 configured
  0 GSM card(s) detected, 0 configured
  0 usb device(s) detected, 0 configured

Configurator will create the following files:
        1. Wanpipe config files in /etc/wanpipe
        2. Dahdi config file /etc/dahdi/system.conf
        3. chan_dahdi config file /etc/asterisk/chan_dahdi.conf


Your original configuration files will be saved to:
        1. /etc/dahdi/system.conf.bak
        2. /etc/asterisk/chan_dahdi.conf.bak


Your configuration has been saved in /etc/wanpipe/debug-2024-10-08.tgz.
When requesting support, email this file to techdesk@sangoma.com


###################################################################

Configuration Complete! Please select following:
 1. YES - Continue
 2. NO - Exit
[1-2]:1

Dahdi and Wanpipe configuration complete: choose action
 1. Save cfg: Restart Asterisk & Wanpipe now
 2. Save cfg: Restart Asterisk & Wanpipe when convenient
 3. Save cfg: Stop Asterisk & Wanpipe now
 4. Save cfg: Stop Asterisk & Wanpipe when convenient
 5. Save cfg: Save cfg only (Not Recommended!!!)
 6. Do not save cfg: Exit
[1-6]:1

Stopping Asterisk...

Stopping Wanpipe...


Unloading Dahdi modules...

Removing old configuration files...

Copying new Wanpipe configuration files...

Copying new Dahdi configuration file (/etc/dahdi/system.conf)...

Copying new chan_dahdi configuration files (/etc/asterisk/chan_dahdi.conf)...

Starting Wanpipe...

Starting WAN Router...
Loading WAN drivers: wanpipe done.
Starting up device: wanpipe1
--> Loading ec image OCT6116-64S.ima...
Configuring interfaces: w1g1 /usr/sbin/wanrouter: line 727: ifconfig: command not found

done.

Loading Dahdi...

DAHDI Tools Version - 3.4.0

DAHDI Version: 3.4.0
Echo Canceller(s): HWEC
Configuration
======================

SPAN 1: ESF/B8ZS Build-out: 0 db (CSU)/0-133 feet (DSX-1)

24 channels to configure.

Setting echocan for channel 1 to mg2
Setting echocan for channel 2 to mg2
Setting echocan for channel 3 to mg2
Setting echocan for channel 4 to mg2
Setting echocan for channel 5 to mg2
Setting echocan for channel 6 to mg2
Setting echocan for channel 7 to mg2
Setting echocan for channel 8 to mg2
Setting echocan for channel 9 to mg2
Setting echocan for channel 10 to mg2
Setting echocan for channel 11 to mg2
Setting echocan for channel 12 to mg2
Setting echocan for channel 13 to mg2
Setting echocan for channel 14 to mg2
Setting echocan for channel 15 to mg2
Setting echocan for channel 16 to mg2
Setting echocan for channel 17 to mg2
Setting echocan for channel 18 to mg2
Setting echocan for channel 19 to mg2
Setting echocan for channel 20 to mg2
Setting echocan for channel 21 to mg2
Setting echocan for channel 22 to mg2
Setting echocan for channel 23 to mg2
Setting echocan for channel 24 to mg2

Starting Asterisk...

Listing Asterisk channels...

   Chan Span Signalling           Extension  Context         Language MOH Interpret        Blocked    In Service Alarms       Description
 pseudo    0 Pseudo                          default                  default                         Yes        No Alarm
      1    1 FXO Kewlstart                   from-internal            default                         Yes        Yellow Alarm
      2    1 FXO Kewlstart                   from-internal            default                         Yes        Yellow Alarm
      3    1 FXO Kewlstart                   from-internal            default                         Yes        Yellow Alarm
      4    1 FXO Kewlstart                   from-internal            default                         Yes        Yellow Alarm
      5    1 FXO Kewlstart                   from-internal            default                         Yes        Yellow Alarm
      6    1 FXO Kewlstart                   from-internal            default                         Yes        Yellow Alarm
      7    1 FXO Kewlstart                   from-internal            default                         Yes        Yellow Alarm
      8    1 FXO Kewlstart                   from-internal            default                         Yes        Yellow Alarm
      9    1 FXO Kewlstart                   from-internal            default                         Yes        Yellow Alarm
     10    1 FXO Kewlstart                   from-internal            default                         Yes        Yellow Alarm
     11    1 FXO Kewlstart                   from-internal            default                         Yes        Yellow Alarm
     12    1 FXO Kewlstart                   from-internal            default                         Yes        Yellow Alarm
     13    1 FXO Kewlstart                   from-internal            default                         Yes        Yellow Alarm
     14    1 FXO Kewlstart                   from-internal            default                         Yes        Yellow Alarm
     15    1 FXO Kewlstart                   from-internal            default                         Yes        Yellow Alarm
     16    1 FXO Kewlstart                   from-internal            default                         Yes        Yellow Alarm
     17    1 FXO Kewlstart                   from-internal            default                         Yes        Yellow Alarm
     18    1 FXO Kewlstart                   from-internal            default                         Yes        Yellow Alarm
     19    1 FXO Kewlstart                   from-internal            default                         Yes        Yellow Alarm
     20    1 FXO Kewlstart                   from-internal            default                         Yes        Yellow Alarm
     21    1 FXO Kewlstart                   from-internal            default                         Yes        Yellow Alarm
     22    1 FXO Kewlstart                   from-internal            default                         Yes        Yellow Alarm
     23    1 FXO Kewlstart                   from-internal            default                         Yes        Yellow Alarm
     24    1 FXO Kewlstart                   from-internal            default                         Yes        Yellow Alarm

Type "asterisk -r" to connect to Asterisk console


Wanrouter start complete...
cat: /etc/inittab: No such file or directory
Warning: Failed to determine init boot level, assuming 3

Wanrouter boot scripts configuration...

Removing existing wanrouter boot scripts...OK
Would you like wanrouter to start on system boot?
 1. YES
 2. NO
[1-2]:1


Verifying Dahdi boot scripts...
Verifying Dahdi boot scripts...Enabled (level:01)
Verifying Dahdi shutdown scripts...Enabled (level:01)
Enabling wanrouter init scripts ...(start:0, stop:0)

Would you like to execute 'dahdi_cfg' each time wanrouter starts?
 1. YES
 2. NO
[1-2]:2

Removing old smg_ctrl boot.....OK
Removing old smg_ctrl_safe boot.....OK
Sangoma cards configuration complete, exiting...
This will ultimately create a few files.
Our /etc/wanpipe/wanpipe1.conf looks like this, we don’t need to touch it,
# cat /etc/wanpipe/wanpipe1.conf
...
#================================================
# WANPIPE1 Configuration File
#================================================
#
# Date: Wed Dec  6 20:29:03 UTC 2006
#
# Note: This file was generated automatically
#       by /usr/local/sbin/setup-sangoma program.
#
#       If you want to edit this file, it is
#       recommended that you use wancfg program
#       to do so.
#================================================
# Sangoma Technologies Inc.
#================================================

[devices]
wanpipe1 = WAN_AFT_TE1, Comment

[interfaces]
w1g1 = wanpipe1, , TDM_VOICE, Comment

[wanpipe1]
CARD_TYPE 	= AFT
S514CPU 	= A
CommPort 	= PRI
AUTO_PCISLOT 	= NO
PCISLOT 	= 4
PCIBUS  	= 3
FE_MEDIA	= T1
FE_LCODE	= B8ZS
FE_FRAME	= ESF
FE_LINE		= 1
TE_CLOCK 	= NORMAL
TE_REF_CLOCK    = 0

TE_HIGHIMPEDANCE	= NO
TE_RX_SLEVEL    = 360
HW_RJ45_PORT_MAP = DEFAULT
LBO 		= 0DB
FE_TXTRISTATE	= NO
MTU 		= 1500
UDPPORT		= 9000
TTL		= 255
IGNORE_FRONT_END	= NO
TDMV_SPAN		= 1
TDMV_DCHAN		= 0
TE_AIS_MAINTENANCE = NO         #NO: defualt  YES: Start port in AIS Blue Alarm and keep line down
                                #wanpipemon -i w1g1 -c Ttx_ais_off to disable AIS maintenance mode
								#wanpipemon -i w1g1 -c Ttx_ais_on to enable AIS maintenance mode
TDMV_HW_DTMF		= YES		# YES: receive dtmf events from hardware
TDMV_HW_FAX_DETECT		= NO		# YES: receive fax 1100hz events from hardware
HWEC_OPERATION_MODE     = OCT_NORMAL    # OCT_NORMAL: echo cancelation enabled with nlp (default)
										# OCT_SPEECH: improves software tone detection by disabling NLP (echo possible)
										# OCT_NO_ECHO:disables echo cancelation but allows VQE/tone functions.
HWEC_DTMF_REMOVAL       = NO    # NO: default  YES: remove dtmf out of incoming media (must have hwdtmf enabled)
HWEC_NOISE_REDUCTION    = NO    # NO: default  YES: reduces noise on the line - could break fax
HWEC_ACUSTIC_ECHO       = NO    # NO: default  YES: enables acustic echo cancelation
HWEC_NLP_DISABLE        = NO    # NO: default  YES: guarantees software tone detection (possible echo)
HWEC_TX_AUTO_GAIN       = 0     # 0: disable   -40-0: default tx audio level to be maintained (-20 default)
HWEC_RX_AUTO_GAIN       = 0     # 0: disable   -40-0: default tx audio level to be maintained (-20 default)
HWEC_TX_GAIN            = 0		# 0: disable   -24-24: db values to be applied to tx signal
HWEC_RX_GAIN            = 0		# 0: disable   -24-24: db values to be applied to tx signal

[w1g1]
ACTIVE_CH	= ALL
TDMV_HWEC	= YES
MTU 		= 8
Additionally, /etc/dahdi/system.conf will look like this and we also do not need to touch it,
# cat /etc/dahdi/system.conf
...
#autogenerated by /usr/sbin/wancfg_dahdi do not hand edit
#autogenrated on 2023-11-28
#Dahdi Channels Configurations
#For detailed Dahdi options, view /etc/dahdi/system.conf.bak
loadzone=us
defaultzone=us

#Sangoma A101 port 1 [slot:4 bus:3 span:1] <wanpipe1>
span=1,1,0,esf,b8zs
fxoks=1-24
echocanceller=mg2,1-24
Then, we will want to update etc/asterisk/chan_dahdi.conf. Here, I set up three lines, and ensure signalling is properly set for the card. It may be easier to just replace this file entirely,
# cat etc/asterisk/chan_dahdi.conf
...
;autogenerated by /usr/sbin/wancfg_dahdi do not hand edit
;autogenrated on 2023-11-28
;Dahdi Channels Configurations
;For detailed Dahdi options, view /etc/asterisk/chan_dahdi.conf.bak
[trunkgroups]

[channels]
cadence=2000,-4000
cadence=300,200,1000,200,300,-4000
cadence=800,400,800,-4000
cadence=400,200,300,200,800,-4000
cadence=400,200,800,200,800,-3600
cadence=200,400,200,400,200,-4000
cadence=800,200,400,200,800,-3600
cadence=1650,-350
cadence=800,200,300,200,400,-4000
cadence=400,200,400,-2000

[fxs](!)
usecallerid=no
hidecallerid=no
callwaiting=no
;usecallingpres=yes
callwaitingcallerid=no
threewaycalling=no
transfer=no
canpark=no
cancallforward=no
callreturn=no
;echocancel=yes
;echocancelwhenbridged=yes
;relaxdtmf=yes
;rxgain=0.0
;txgain=0.0
;group=1
;callgroup=1
;pickupgroup=1
immediate=yes
;adsi = yes
;useincomingcalleridondahditransfer = no

;Sangoma A101 port 1 [slot:4 bus:3 span:1] <wanpipe1>
context=from-internal
;group=1
;echocancel=yes
signalling=fxo_ks
;channel => 1-24

[line-1](fxs)
dahdichan = 1
callerid = Mike Dank <2630500>

[line-2](fxs)
dahdichan = 2
callerid = Mike Dank <2630501>

[line-3](fxs)
dahdichan = 3
callerid = Mike Dank <2630502>
At this point you should manually power-cycle the channel bank, and reboot the machine to make sure everything loads properly on boot (and runs the new, proper config),
# reboot
Setup for incoming calls over our PSTN VoIP number and direct SIP connection are out of scope for this document, but they can share a common context in /etc/asterisk/extensions.conf so any call coming into the context gets directed to the first line on our channel bank where the Protel modem is connected,
# cat /etc/asterisk/extensions.conf
...
[protel]
exten => _.!,1,NoOP()
    same => n,Dial(DAHDI/1,10,m(ringback))
    same => n,Hangup()
Programming a Phone
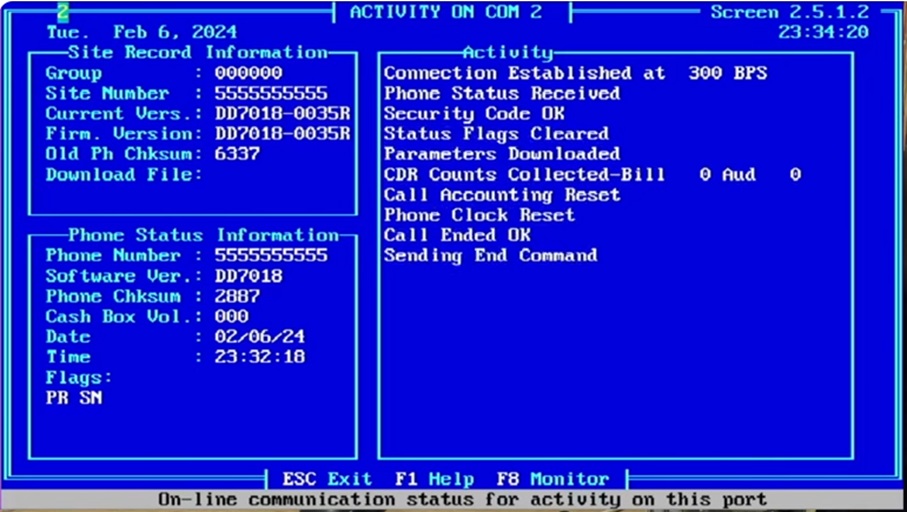
Now that the PBX is set up, I have the Protel modem connected to line 1 of the channel bank. The local number for this line is 263-0500 which works from any phone I connect to the PBX as well as through PhreakNet. I have a PSTN dial-in number 225-277-6835 and from any Protel phone on the PSTN, programming can be achieved easily:
- To program your phone, first make sure it is on-hook.
- Now, hold down the program button and take the phone off-hook, you should hear a single beep. You can now release the program button.
- On the keypad, dial
005555555555*, you should then hear a single beep. - Next, dial
252252776835*(for PSTN) or252630500*(for PhreakNet), you should then hear a single beep. - If you hear more than one beep on the above steps, simply repeat the step.
- Finally, dial
*#3. You should hear the phone say the phone number of the phone (in this case 555-555-5555) and then you will hear the phone connect to ExpressNet and download the necessary configuration. This should take around 5 minutes total. - After the download finishes, dial
*#6, and you should hear a timestamp of the last successful download.
Now, you have a successfully programmed phone!
Conclusion
We are now able to program out Protel payphones, but more importantly with the addition on dial-in numbers, anyone can point their phone at our programming line and have their phones programmed instantly! We have discovered that as long as our modem stays on the channel bank, calls coming in via SIP seem to work just fine, which means payphone owners can leverage cheap ATAs even if we cannot.
In the future, we will likely be looking into reverse-engineering of the Protel download to attempt phone programming without an actual modem or the XNet software. We are also considering an automated programming request system that would create custom programming packages via a webform so they are instantly available to use to program a phone. Lastly, we will be looking at setting up similar programming lines for ElcoTel and Nortel Millennium phones!